Apr 13, 2010

Join Prima and Clip-It-Up as we venture together to create some amazing altered Clip-It-Ups using lots of luscious Prima products! Plus a chance to win a Clip it Up Mini!!!

image
How to win a FREE Clip it Up Mini
1.  Visit Prima’s blog a see how they have decorated the Clip it Up.  Check back throughout the month for new ideas.
2. Come back to our blog and leave a comment about how you would decorate a Clip it Up. 
3. The drawing will be held on the 27th of April.  Check our blog occasionally before then for multiple ways to enter.

Apr 12, 2010

Quote of the Week

“You’ve got a lot of choices. If getting out of bed in the morning is a chore and you’re not smiling on a regular basis, try another choice.”
― Steven D. Woodhull

Apr 9, 2010

Emeline's Altered Clip it Up

I'm constantly amazed by the many ideas the designers at Simply Renee's come up and I hope you are too ! Here in my craft space, the Clip it Up has its mighty presence to match its mighty functionality.

I took a good look at my Clip it up and noticed a great potential!
The simple metal piece at the top of the Clip It Up (let's call it the T-Top) looks like a stage waiting to be decorated; cajoling me to make something out of it.
This centre stage can be embellished with seasonal items, flowers etc. Here is what i'd done with mine.


- wrapped the tip of the stand with satin ribbon and tulle.
- i used cabbage roses (my current favourite flowers!) and arranged them onto the metal piece. I used a little hot glue to hold these into place. I know I can be fickle and I predict i'll want a different look perhaps a few weeks later. Thus I opted to use hot glue sparingly.


- Embellish further with green foliage. Apply hot glue sparingly.

that has to be the fun part - deciding what to affix the T-top with!
I chose to decorate the Clip It Up with flowers... but the possibilities are limitless.


You can choose to embellish with seasonal accessories or simply adorn with your favourite colors to spruce up your craft space .

Happy Crafting!

Apr 7, 2010

Too many photos of one event…

Do you have this enormous amount of photos for one event that it keeps you from scrapping it?  That happens to me a lot.  I don’t have time to whip out a mini album and I don’t want to use 40 photos on a bunch of pages.  So, lately I have been taking a handful of the best photos from an event such as my daughter’s field trip and printing them out quite small.  I group them how I want on my layout and try to capture the feeling of the event in just a page or two. 

image

1) Print your photos out and crop them to fit the design of your layout (mine are 2.5 x 1.75 inches.) 

2) Frame your photos using pattern paper above and below. 

For this next step, I decided to add a rub-on.  Rub-ons are something I have always loved but mine got put away in a binder for so long that I never remembered to use them!  Now that I have them out on my Clip it Up where I can see them, I grab them a lot more often. 

image

3) Add rub-on below last layer of paper.

image

4) Adhere trim on the seam line of the paper and photos. 

5) Embellish with homemade flowers (I used dictionary paper and a Prima flower for the middle.) 

6) Adhere title above the photos and journaling below. 

image

image

Supplies:

Cardstock – Bazzilll; Pattern Paper – Webster’s Pages, Collage Press, dictionary paper; Trim – Papertrey Ink; Flowers – Prima; Ink – Versa Magic chalk ink

Julie Overby

Apr 6, 2010

More Facebook Fans More Savings! Update

We're featuring a one day sale on April 15th, 2010 and the discount depends on YOU!!! Here's how it works- Become a FAN of Simply Renee Inc and then send an invite to all your friends and ask them to become fans. The more fans the more savings!!! If you're already a fan then just invite others!!!

If we get 500 Fans you'll receive a 30% discount
If we get 750 Fans you'll receive a 40% discount
If we get 1000 Fans you'll receive a 50% discount

The Coupon Code will be posted on our facebook page by midnight April 14, 2010. The code will be valid for 24 hours only and will be off your ENTIRE purchase on our website (www.clipitup.com).

Plus...to add to the excitement. Over the next few weeks we'll have random drawings and all you have to do to enter is become a fan!!! Make sure you check our page to see if you're a winner and to receive the coupon code for the sale on April 15, 2010.

We're already at 750 fans, but I know we can keep going and reach 1000. Plus we have a special surprise if we exceed the 1000 number. :-) Keep up the great work!!!

Apr 5, 2010

Quote of the Week

“Time you enjoy wasting, was not wasted.”
― John Lennon

Apr 2, 2010

How the Clip it Up can help Organize Your Kitchen…


My friends are going to be shocked at the secret I’m about to reveal . . . for a very organized person I have one unorganized space – the kitchen junk drawer! And today I’m going to share how I’m using this 18” Ribbon Organizer

image

To tame this messy, disorganized drawer:

image

By the way, the steps I followed to organize my kitchen junk drawer are the same steps you can follow for any organization project!

Step 1: Empty the drawer completely.

Step 2: Put away all the things that don’t belong back in their correct place. In my case this was a lot. Hehe! This drawer tended to be the easiest place to dump things!

Step 3: Sort/categorize all that remains. I ended up with lots of little piles on my kitchen table.
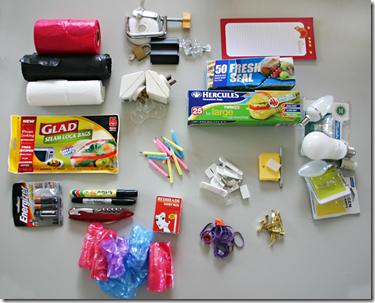
image

Step 4: Organize/put away all items in their new home.

For my drawer, I first lined it with a non-slip mat and used takeout containers to hold some like items. Look how much space I ended up with!

image

I just knew the Ribbon Organizer would be perfect for some of my ‘junk drawer’ items. Here’s a look at the finished result:

image

Garbage bags fit in the top nicely and getting one from the roll is a breeze! The slots in the side are great to keep markers that I use frequently to label items for the freezer etc.
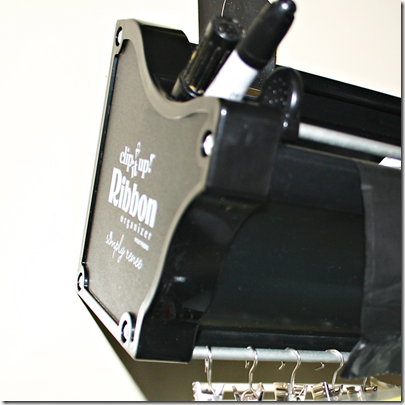
image

As I have a very curious two year old daughter, this was a great opportunity to put things up high, out of her reach such as matches, batteries, light globes etc.

image

Some packets I’ve clipped directly onto the ribbon organizer and smaller items have been placed in a Ziploc bag first.

One last note – I’ve hung my Ribbon Organizer on the back of my kitchen door using over-the-door wreath hangers that I picked up at Christmas! It’s easy and secure and a great way to utilize this organizer if you are unable to permanently screw it to the wall.

Thanks for looking and I’ll be back with more organizing tips soon!

Gail Lindner

Related Posts Plugin for WordPress, Blogger...