I am so excited to share some photos with you of an altered Clip it Up I made using the Little Yellow Bicycle Cupcake Love line. I spent a TON of time on this, and I am so happy with the way it came out. My daughter's birthday was on May 16th, and she turned 2, so I based it around that theme, and the "cupcake" theme from the papers.
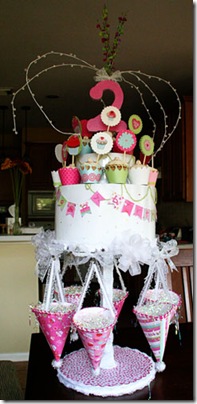
I used two paper mache hat boxes from my local craft store and painted them white and put a crackle and glitter finish on them with a clear varnish. I used some of the Little Yellow Bicycle sprinkle stickers and decorated the edges. I found some beaded string that I draped around the cakes and I made the "Happy Birthday" banner from Little Yellow Bicycle papers. There is a "cupcake Love" banner, too, on the other side, but I forgot to photograph that. That came in one of the packages of stickers from Little Yellow Bicycle. I added some trim to the base of each cake tier.


The #2 on top of the stand was covered in Little Yellow Bicycle paper and is glued to some spools which I painted white to give it a bit more lift. I used some floral picks from the craft store and drilled a hole in the top of the two and glued them in to make a splash of bling from the top of the stand. These tiers are meant to hold cupcakes, of course! :)

This was a great excuse for me to make some yummy vanilla cupcakes. I used the "Cupcake Wrappers" cartridge for the Cricut to cut the wrappers and the scalloped circles for the cupcake picks. I used stickers from the Little Yellow Bicycle embellishments to decorate each pick and added them to the cupcakes. Some of the wrappers are decorated with some lace crape paper from Little Yellow Bicycle, too.

For the Main Base Clip it Up itself, I painted it white and added some ribbon down the center pole. I used a scalloped circle paper from Little Yellow Bicycle for the base, which fit perfectly, and them added trim around the outside edge of the base. On the metal circular bar, I strung some sparkly star garland, and added three large white bows to each end of the arms of the top of the Clip it Up.

The "cones" are meant to hold party favors, but they are actually party hats! I used my SCAL program to cut them on my Cricut, added a pom pom to the top, some ribbon trim around the edges, and some pretty elastic ribbon to go under your chin! Each hat is held by a clip which has a white bow tied to it.

It really turned out just as I had imagined it, although it is much taller than I thought it was going to be! :) Charlotte had such a fun time at her Birthday and the stand was a big hit. But NOW what am I going to do with it? :)

Thanks,
-Audrey
Happy 5 th Birthday Contest!!!!
We have teamed up with Little Yellow Bicycle for a chance to win product from both of us.
Tell us your most creative Birthday project then go to Little Yellow Bicycle and leave a comment too. Facebook fans leave comments on both our walls for double the chance to WIN!!!
Good Luck!!! Winner will be announced July 8th
Happy 5th Birthday Sale 30% off
July 6 through July 31.
Use coupon code : Birthday5
www.clipitup.com (Retail Only)






 Posts


