Mar 31, 2010

Welcome to My World!

After three months of transporting, rearranging and organizing, I think I'm finally ready to unveil my scraproom. It's still kind of a work-in-progress, but if I waited until it was completely finished...well, you'd probably never see it.

So without further ado, here's a peek into my scrap space.

image

The pinstriped walls are a holdover from my daughter's nursery (which I took over in December). It was such a pain to paint them this way that I can hardly bear the thought of repainting.

This is my die-cutting and embellishment area. I repurposed the changing table from the nursery -- turns out it's a perfect storage piece! The larger drawers are great for holding tools, die sets and layouts to be filed. One of these days, I'll get around to mounting the embellishment center on the wall, but I haven't gotten up the nerve to ask DH to help me. (Yes, I'm a wimp.)

image

And this is one of my two (for now) Clip It Up units. This one holds Thickers, other alphas and rubons on the bottom tier and acrylic stamps and smaller packaged embellies on the top. I like that it sits on the corner of my scrap table so all my alphas are within reach when I'm working on a layout.

image 

This is my Expedit shelving from IKEA, and I'm amazed at how much it holds. In addition to my albums and idea books, I keep patterned paper (organized by manufacturer), chipboard shapes and alphas and sewing supplies. Large storage boxes hold page kits, page protectors, alterable items and scraps. My altered projects are displayed along the top.

image 
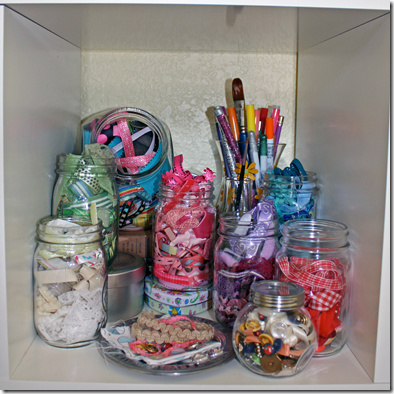
One cubby holds several jars of ribbon (separated by color), plus markers and paintbrushes. Admittedly, it's not the most organized way to keep ribbon, but I love the look of the jars with the different colors and patterns inside.
image

And this is my other Clip It Up -- a mini! It holds smaller embellishments like mini alphas, twine, brads and bling. It sits on top of my Expedit so it's at eye level for easy "shopping."

image 
The Clip It Up products have been incredibly helpful in putting this room together. I used to keep all my products in various shoeboxes with very little rhyme or reason. I could never find anything when I needed it, and there were tons of things I completely forgot I had because they got buried in the clutter. It's so refreshing to be able to see everything I have, and it inspires me to use more variety in my layouts because I can easily find things that go together.

Hope you've enjoyed this little journey inside my space. For more ideas and inspiration, visit my blog

(http://dreaminginscraps.blogspot.com).
Robyn Schaub

Mar 29, 2010

Quote of the Week

“You’ve got a lot of choices. If getting out of bed in the morning is a chore and you’re not smiling on a regular basis, try another choice.”
― Steven D. Woodhull

Mar 26, 2010

Altered Egg Holder

Here is my first blog post at Simply Renée Clip it up!! How cool is that!

It’s my turn to show you an altered item. Lately I bought an egg holder, and my scrappy mind said to me….  “This is perfect for altering!!”

image And yes, It’s real cute on my Easter table with eggs from my own chickens!

Maybe you could find something like my egg holder. I smeared it with gesso, and when all is dried, I sprayed Tattered Angels Glimmermist on it and covered the circle with the egg holes in it with patterned paper…add some flowers vines, and that’s it!

image

image

image

Wishing you a very Blessed Easter!

Wendela

Mar 24, 2010

Flower Power for Boys

I have never thought that flowers are only for girls. I always believe flowers work well with boys as well and it definitely does not make them sissy. My obsession with flowers does not make me wish that I have a girl instead so I can make pretty little stuff for her. In fact, I created lots of projects and layouts using flowers for my hubby and son and I think they look wonderful!

With the release of an awesome huge range of new collection from Prima Marketing, I practically wiped off the shelf in my local scrapbooking store! Lol! The moment I laid my eyes on them, I knew I had to add them to my existing collection of Prima stuff.

I’d love to share with you a page that I’ve created using lots of yummy Prima goodies from the new 2010 Winter collection. I cut out part of the flourishes from the Shabby Chic “Grape Twilight” paper and adhered it onto a white cardstock at the bottom right corner of the page.

image

I then cut out a frame from Hambly Studio “All Mixed Up” overlay , inserted it below a picture of my boy, which was matted with maroon color cardstock. I also cut out the flower flourish from the Raspberry Tea “Peach Cobbler” paper and layered them under the picture.

image

I created layers of flowers and leaves on the left side of the picture to add some texture to the layout.

image

Next, I added some crystal from “Say It With Crystal* to the top right corner of the picture, which adds a little more dimension to the layout.

image

I completed this layout with a clutter of more flowers, leaves and crystal at the bottom right corner of the picture. The title “Precious” is from the Shabby Chic Journaling Chipboard. 

image

And voila! Here’s the finished layout with lots of beautiful Prima products……flowers, leaves, crystal and papers……..a feminine touch but still works perfectly for a boy.

image

Don’t be afraid to use flowers for boys or men layouts, they will look great!

Leena

Mar 23, 2010

More Fans, More Savings!!!

We're featuring a one day sale on April 15th, 2010 and the discount depends on YOU!!! Here's how it works- Become a FAN of Simply Renee Inc on facebook (click here) and then invite all your friends and ask them to become fans. The more fans the more savings!!! If you're already a fan then just invite others!!!

If we get 500 Fans ...you'll receive a 30% discount
If we get 750 Fans you'll receive a 40% discount
If we get 1000 Fans you'll receive a 50% discount

The Coupon Code will be posted on our facebook page by midnight April 14, 2010. The code will be valid for 24 hours only and will be off your ENTIRE purchase on our website (www.clipitup.com).

Plus...to add to the excitement. Over the next few weeks we'll have random drawings and all you have to do to enter is become a fan!!! Make sure you check our page to see if you're a winner and to receive the coupon code for the sale on April 15, 2010.

Mar 22, 2010

Quote of the Week

“I try to take one day at a time, but sometimes several days attack me at once.”
― Jennifer Yane

Mar 19, 2010

Ribbon Bliss

I never really knew how much ribbon I had until it became organized.  Before I had ribbon in jars, on rings, hanging from the slat wall, and wrapped around clothespins. I couldn’t tell how much of any particular ribbon I had, never mind if there were doubles of anything. Pile on top of that, I’m a very visual artist, and I am inspired by seeing my supplies. Having it in so many different spots wasn’t helping my creative mojo one bit.

Then, like out of an organizational gurus mind, the 36” Ribbon Organizer, gave me the answer to make all my ribbon come together.

clip_image002

From whites to blacks and everything in between, my ribbon is now visible and easy to get to. All of my spools are located nicely in the top basket of the Ribbon Organizer. I was amazed at how many spools could actually fit in the top.

clip_image004

Any smaller pieces or unspooled snippets are arranged on the bottom rod using the clips provided. For more delicate ribbons and trims, the Clip Grips are a wonderful addition and protect those things like crochet and silk.

clip_image002[1]

All in all, I think the Ribbon Organizer was the best invention for keeping those beautiful ribbons and trims organized and in sight. I’m all about an organized space and this has both done that and given me extra space for other products. Now I just gotta get the Ribbon Organizer Attachment!!!

clip_image004[1]

Hope you are all having a fantastic week so far. Spring is right around the corner and I just can’t wait

Toodles

Erika Taylor

Related Posts Plugin for WordPress, Blogger...