Jan 30, 2012

Quote!!

"Laughter is the shortest distance between two people"
-Victor Borge

Jan 25, 2012

My Heart And Soul


Hi my fellow crafters! Natasha here to share a layout I had created a little while back. The little boy in the photo is my lil' man about eight years ago. Check out those cheeks!! (Don't tell him I said that... he gets embarrassed. LOL)


The Brick Wall Panel is manufactured by The Dusty Attic. I cut it apart, inked it with Glimmer Mist and distressed it using Distress embossing powder.


A mix of Prima flowers, Tim Holtz Foliage and flower brads...


The 'eyelet border' was created using a Fiskars punch and a whole lot of eyelets!


The title is made up of Grungeboard letters that were inked and painted. The heart is actually a cute little chipboard element. I added eyelets and Distress embossing powder to the large cog to grunge it up a bit. I am most definitely a chipboard fanatic and I have all of my chippies on a Clip it Up Jumbo. It is completely full! That is why I added an Upper Tier! LOL!


The edges of the photos and the corrugated board were dry-brushed with white acrylic paint.


I love having plenty of layers on my layouts! :o)


Thanks for taking a peek!! Have a beautiful day!


Jan 23, 2012

Quote!!

You can observe a lot by just watching.

- Yogi Berra

Jan 18, 2012

'Beautiful' Mirror

Hello fellow crafters!! Natasha here with a mirror I had altered a little while back.
The actual wooden mirror was purchased at Ikea for $2.99. I bought a bunch of them because the wooden surface is perfect for altering. And because they were inexpensive too!!

The entire surface of the mirror was covered with torn pieces of The Crafty Chronicle and adhered with Beacon's Fast Finish Decoupage. Then I added a layer of gesso and spritzed on several colors of Smooch Spritz. For a simple tutorial, click HERE.
I also applied ceramic stucco to random areas of the mirror for added texture. Love this stuff!
The distressed dots were embossed using white embossing powder by Clearsnap.
This cluster is made up of mulberry flowers, satin flowers, cut flowers from Donna Salazar's Vintage Gears paper and Prima trinkets and bling.
The chipboard wire dress form and mini corner are manufactured by The Dusty Attic. I created the dress from paper, tulle and trim. I also added eyelets, ribbon, pearls, an antique trinket and Fairy Dust Glitter to further embellish the dress.
Here is a peek at the bottom of the dress form. I randomly painted it and inked it with Leather Mix'd Media Inx. These Inx come in such gorgeous colors!
The 'Beautiful' chippie was painted with acrylic paint and adhered using a spray adhesive to avoid glue seeping out from behind this delicate piece.

I hope you enjoyed my mirror. Altered projects make wonderful gifts for those special people.
Have a beautiful day!


Jan 11, 2012

True Friend


Hi everyone! Natasha here with a special layout to share. For this layout I used AMAZING papers by Pion Design. I ADORE Pion Design papers! Pure elegance and beauty! (Just a minute... wiping up the drool.)

The photo is of my beautiful friend, Mistra. We have become very close over the past year and every day I continue to be surprised at how alike (and dorky) we are. She is my twin, although I am still working on my Aussie accent LOL.


The beautiful circular frame around my layout is part of the Floral Frame Set (DA0576) by The Dusty Attic. I inked the frame in several different colors and added Fairy Dust Glitter to the flowers.


To achieve this layered look with flowers, I adhered the flowers with different types of adhesives such as Helmar Zapdots, 450 Quick Dry and Liquid Scrap Dots.


The large flower you see here is hand-made. You can find the tutorial for my Cabbage Rose HERE. I used Donna Salazar's Rose Creations dies and assembled the flower with my favorite adhesive... Helmar 450 Quick Dry.


Here I layered a paper strip cut from one of the Pion Design papers, vintage lace and seam binding.


So very true... sniffle. :o)

The title is made from Dusty Attic's Typewriter Font Alphabet Set (DA0143). I used Zapdots (cut in half) to adhere these letters to my layout.


I tend to add a lot of hand-stitching to my layouts. I love the added texture it gives.


I adhered this transparent butterfly using Helmar Liquid Scrap Dots. Can you see the adhesive? Nope!! This amazing products adds dimension but is 'discreet'.

Thank you for visiting! Have a beautiful week ahead!


Jan 9, 2012

Quote!!!

I’m really good at remembering what I forgot.~ Renee Hull

Jan 4, 2012

Organize You Way in 2012!!!

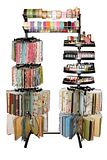
With the Clip it Up

All-In-One

You're in charge!

Mix and match

It's all up to you!


Choose the components you need to create the storage that works for you!
The All-In-One frame allows you to add and adjust components for your personal needs. With its sturdy, yet simple design,grooves are placed every inch apart to allow maximum use of the entire frame.

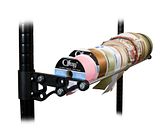
Want more ribbon space? Check out the double-sided ribbon holder.

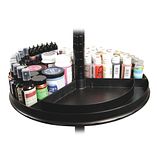
Add the mutli-purpose trays for the loose items you need organized but want within easy reach.

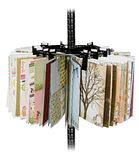
The All-In-One uses the classic Clip it Up rotating storage arms that continue to be everyone favorites. Now the opportunity to have it your way is combined with the unique visual storage concept all in one location.

01-045 All-In-One Frame
MSRP: $125.00


03-005 -Floor Model Arm
MSRP: $35.00

03-009 All-In-One Single Ribbon

MSRP: $45.00


03-009 All-In-One Double Ribbon

MSRP: $70.00

 03-007 Clip it Up Tray 
                     MSRP: $50.00


   So Convenient, so simple The All-In-One

           from Simply Renee

Visit our website

www.clipitup.com

Jan 3, 2012

Quote!!!

There is great meaning in life for those who are willing to journey.~ Jim England

Related Posts Plugin for WordPress, Blogger...