

Jun 29, 2011
Happy Summer fellow crafters! Natasha here and I hope you are all enjoying the warm weather and relaxing time with your families, but don't forget to squeeze in a little crafting time for yourself. :o)  Today I would like to share a project I made using Pink Paislee's Butterfly Garden Collection and The Dusty Attic's Large Storage Drawers. This storage set is easy to assemble and decorate. It comes with sixteen drawers, but I removed four drawers so that I could further alter my project.
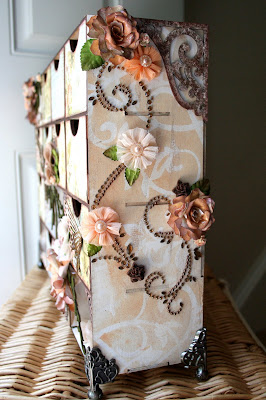
 This flower was hand-made using coordinating papers. You can find a tutorial for this flower HERE.
 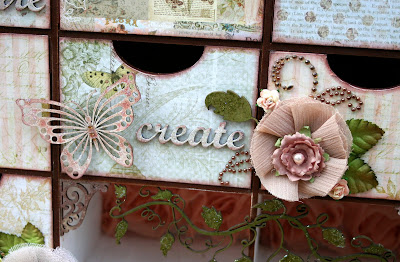 All of the chipboard elements including the vine, butterflies, ornate corners and mini words are also made by The Dusty Attic.
 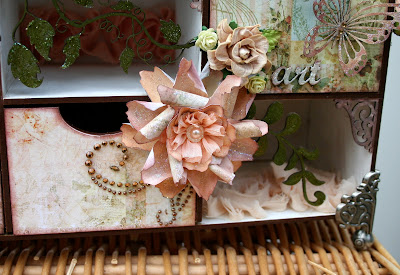 I attached Foundations Metal Feet by Tim Holtz to the bottom corners of my project. I also added a Rose Trim by Prima to the open spaces.
 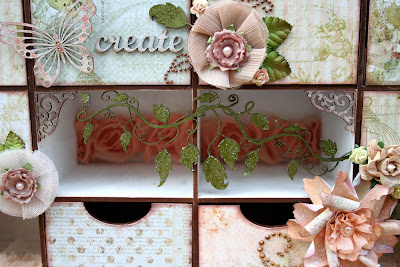 This chipboard vine is one of my favorite chippies! It is so delicate and intricate. I inked it with Distress Ink and highlighted each leaf with coordinating Stickles. Before I go, I would like to show you how I organize my clear stamps.
  I store my stamps in Cropper Hopper Unmounted Stamp Books. I labeled each stamp book using divider tabs and hung them on a Clip It Up Wall Mount.
 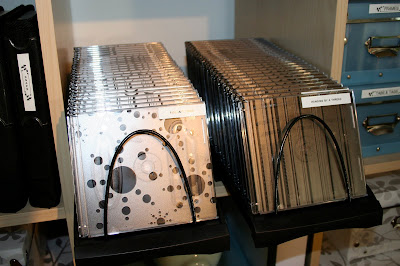 The smaller stamps are stored in CD jewel cases that are organized in pull-out trays.
 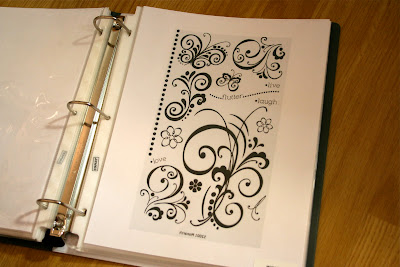 I also created a stamp catalog by scanning the transparencies that came with each stamp set. This helps me see which stamps I own and I can find them more easily. That's all for today! Thanks for stopping by to take a peek at my project. Have a beautiful day!
Jun 27, 2011
Jun 24, 2011
Winner of the Mini!!!
Congratulations Ana Rivera
Ana Rivera said...
I just love how you decorated this Clip It Up. I would also alter my Clip It Up with my three daughters and my mom. Like you, my mom passed away and my daughters love reminiscing about what they miss the most of their grandmother. This would be a lovely way to display my mom's pictures with my daughters. Like I commented on MME blog, I get my inspiration through paper and embellishments. When I come across beautiful papers it makes me want to create something special. Thanks for such great ideas.
Misty thanks for such an inspiring post we all have someone special who has touched our life's and changed it for the better. What a great way to honor them.
Ana email us your information at: clipitup@gmail.com to received your Mini.
Go check out My Mind’s Eye Blog to see who won on their blog.
Thanks Misty and My Mind’s Eye!
Jun 22, 2011
Chance to Win a Mini and MME product!!!
When Renee and Carolyn sent this Clip It Up Main Base to me along with the gorgeous Stella and Rose "Hazel" collection...I was immediately overwhelmed with memories of my Grandmother.

The colors and patterns, along with the beautiful embellishments made me want to Alter this Clip It Up in honor of her memory. She was the one who taught me to crochet. She taught me to take beautiful pictures. She taught me to preserve my photos in albums. She is the one who taught me to read patterns, mix colors, and create beautiful works of art long before I even started school. Many, many hours were spent in her living room, in her favorite chair creating yet another beautiful masterpiece by only the light light of the lamp on her side table. She was my mentor...my inspiration, and my reason for having the love of all things ART.
My Grandmother is gone now, but her memory will live in my heart forever. She was my inspiration for altering this Clip It Up Main base.
To begin, I disassembled my unit and spray painted all of the parts with an antique ivory.
I reassembled it when it had dried, and added in all of the beautiful "Stella and Rose" papers and embellies.
For the center rod, I used the roller from and empty roll of gift wrap and slipped it over the unit's rod to create an alterable post.

Everything has a good layer of Mod Podge on it to seal it in and protect it.
Once all papers were in place and sealed in, I added in all of the embellies that said "Grandma" to me.
The lacy edges, the strand of pearls, the hand made flowers and the store bought ones...

But most of all...the Lamp. The lamp is front and center on this Clip It Up Main base ...because it is the ONE constant in all of my memories of my beautiful Grandmother, whom I love and miss dearly.

Altering this unit was not only fun, but therapeutic. I drew my inspiration from the most unlikely of sources. Now, this piece holds more value to me than it would if it were just another "random project."
Leave a comment below for a chance to WIN a Mini CIU. Then go to My Mind’s Eye Blog and leave a comment there for a chance to WIN Stella and Rose "Hazel" collection.
What Clip It Up would you altered ? and where do you draw your inspiration from?
30% off Sale Today only on our website www.clipitup.com
Use discount code: Memories30
(Retail Only) June 22,2011
Happy Shopping!!!
Jun 20, 2011
Jun 15, 2011
Capture The Moment!!
Hello everyone,
Sarah here again to share with you some really fun projects that I created with the BoBunny Ad Lib collection. BoBunny was so kind and generous to have sent me this bright and cheery collection. I love the fun color combination of the BoBunny Ad Lib collection and just couldn’t resist the coordinating chipboard, stickers, and rub ons. First, I took some light teal spray paint to my Clip It Up Main Base, and then really decked it out with lots of BoBunny pattern paper and chipboard embellishments.
I am so thrilled with all of the fun colors on this Clip It Up Main Base that I had to add even more color. Now, this Clip It Up holds all of my fabric that I have folded into about 6”x12” pieces and hung them with the Clip It Up metals clips.


I also couldn’t resist creating a layout with this fun Ad Lib collection. My daughter’s last day of school photos that she snapped of herself walking down our street on the way to her bus were just perfect to use with this line.
")


I hope that you all have had just as much fun altering your Clip It Ups as I have, and if you have yet to alter a Clip It Up then you must give it a try!!
Have a wonderful day!
Jun 13, 2011
Quote of the Week
A perfect summer day is when the sun is shining, the breeze is blowing, the birds are singing, and the lawn mower is broken. ~James Dent
Jun 8, 2011
Clip it Up Kitchen Style
Hi Everyone!
It's Barbara here to share my altered Mini Clip it Up. Now I know we all think of scrapbooking organization when it comes to Clip it Up products. But there are so many other wonderful uses for them. Today I am going to show you how to use it for your kitchen. I call it my Kitchen Mini Clip it Up. The papers were donated by My Little Yellow Bicycle, and ironically match my kitchen colors pretty well. I wanted to paint the Mini Clip it Up white, so while I was waiting for the paint to dry , I started making some recipe cards to hang on my Kitchen Mini Clip it Up. They were a lot of fun to make, and look so cute. I can't wait to fill it up and Clip it UP! Here are some photos.


For the base of the Kitchen Mini Clip it Up I cut a circle, and then used shaped scissors for the scallops around the circle. I then used a white signo pen to put a dot on each scallop. The shapes on the circle were cut free hand out of the paper. I have to admit I didn't quite get the paper around the pole quite right, so that is why you see the scalloped papers at the bottom of the pole. I ran out of paper and had to make do. I am sure we all do this from time to time. Mistakes happen and you do your best to fix them. But all in all I think it fits my kitchen perfectly!
I hope you enjoy it, and that it inspires you to find different and unique uses for Clip it Up products!
Have a wonderful day!
Jun 6, 2011
Jun 3, 2011
Bobbi’s Last Day
Hi – This is Bobbi! After 3 1/2 years of working and playing at Simply Renee Inc, today is my final day. It’s been a great few years and I’ve been so blessed to have the chance to work with Renee and Carolyn. They are great woman and I admire their talents and creativity. I’ve watched Simply Renee grow from Renee’s basement into a warehouse and I’m proud to say I’ve been a part of it. One of my favorite tasks was blogging and working with our design teams and I am sad to say goodbye. I have learned so much from all of you!!! I love you all and wish you the best.
I’m not off to bigger and better things just different things and I hope to run into many of you along the way!
Love, Bobbi
I would just like to personally thank Bobbi for her friendship, hard work, patience, computer skills, problem solving and organizational help in the office and warehouse. You were my right hand “woman” that I trusted to keep things going while I worked on developing new products.
It’s been great having you in our Simply Renee “family” and wish you nothing but the best in your future. Thanks for everything! Carolyn and I love you and know you and Nathan will accomplish great things!

Stay in touch!
Thanks again!!!!!
Renee
Sarah’s Craft Space
Hello Everyone,
Sarah here to share with you my scrapbook space and how I use my Clip it Up Main Base and Upper Tier. I am just thrilled with how much product the Clip it Up holds, and it definitely makes my life easier and much more stress free by keeping my products tidy, organized, and at the tips of my fingers. I use my Clip it Up to store stickers, alphas, embellishments, and die cuts from companies and manufacturers that I use most often. For me, I like to keep the company lines and collections together in one place, so that when I need to use the entire line it’s very easy to find all of the pieces that I’m looking for. Instead of keeping the buttons with my buttons, alphas with my alphas, chipboard and stickers with my chipboard and stickers, I keep the entire collection together on my Clip it Up, and it only takes a couple of seconds to grab all of the elements I need as opposed to gathering the items from all over my scrap room.
Here is a video tour of my scrapbook room and how I have put my Clip it Up to good use.

Jun 2, 2011
Celebrate the men in your life with a Clip it Up!!! *CONTEST*
Men have lots of different hobbies fishing, golfing, skiing, biking and hunting and they have the same problem with organizing as women do.
Remember you use what you See!

Scott Bryne's hobby and passion is "Tying Flies" What a great way to display all his items and now he can see what he has. Scott loved it so much he took it to a local fishing store and now the store is carrying our products. A big thanks to Scott!!!!
Help us think of more ways men can use Clip it Up products to get organized. Email or leave us your idea as a comment and we will pick one random winner to receive the Clip it Up Jumbo . Contest ends June 30th.
Jun 1, 2011
Great ways to use the Swinging Wall Arm & Pouty Granddaughter Layout!
Happy Wednesday everyone!
I hope you had a wonderful Memorial Day weekend! For today’s post I want to talk about the Clip It Up Swinging Wall Arm . These are handy little things to have around. I have found them to be perfect for holding the embellishments I receive in my Kit of the Month club. I don't like putting them with my other embellishments because I am afraid I won't remember which is which. The Clip It Up Swinging Wall Arm solved my problem. I now know where to go to find my kit of the month embellishments.

Another good idea for these is to use them for a temporary storing station of new product. If you are like me, you don't always have the time to put your new product where it belongs, or you might have to make room for the new product. By using a Clip It Up Swinging Wall Arm you won't have new product laying around cluttering up your room. In a matter of seconds you can clip your new product up and then when you find the time, put your new product where it belongs, thereby making room for your next purchase. These are pearls I recently purchased, and I am trying to decide on where I want their home to be.

Here is my layout:


I used various Jillibean papers that were donated. I added white cardstock and did quite a lot of punch work. Like my last post, I tried to make most of my embellishments out of the paper. I did add some white buttons and Thickers. The tiny flowers in the center of the blue flowers are made by Prima. The subject of my layout is my Granddaughter who was not too happy at that moment, but I think it makes an adorable photo. I hope you have enjoyed my ideas and layout.
Have a wonderful week!
Subscribe to:
Posts (Atom)


