Apr 28, 2010

Playing with Canvas

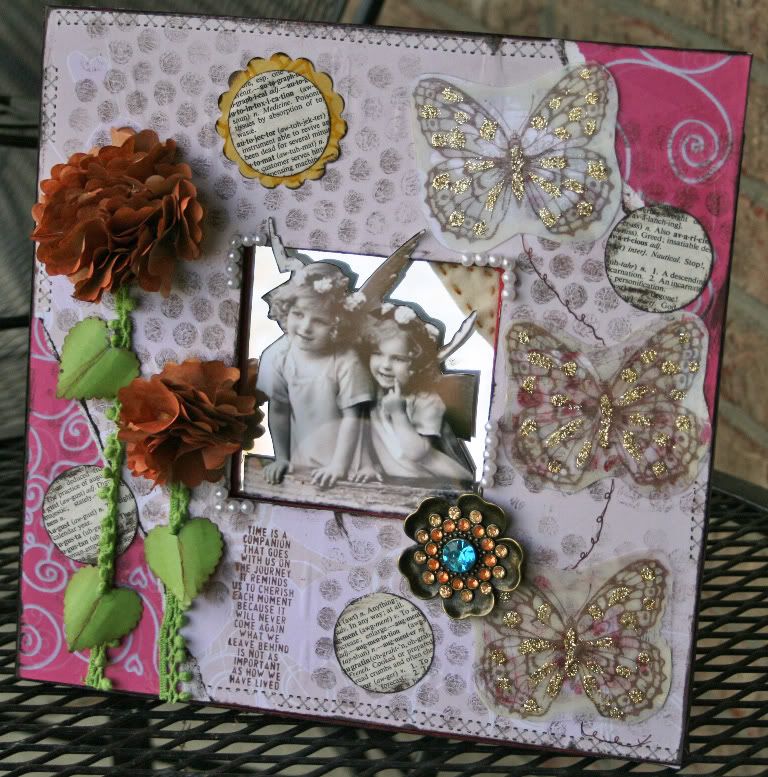
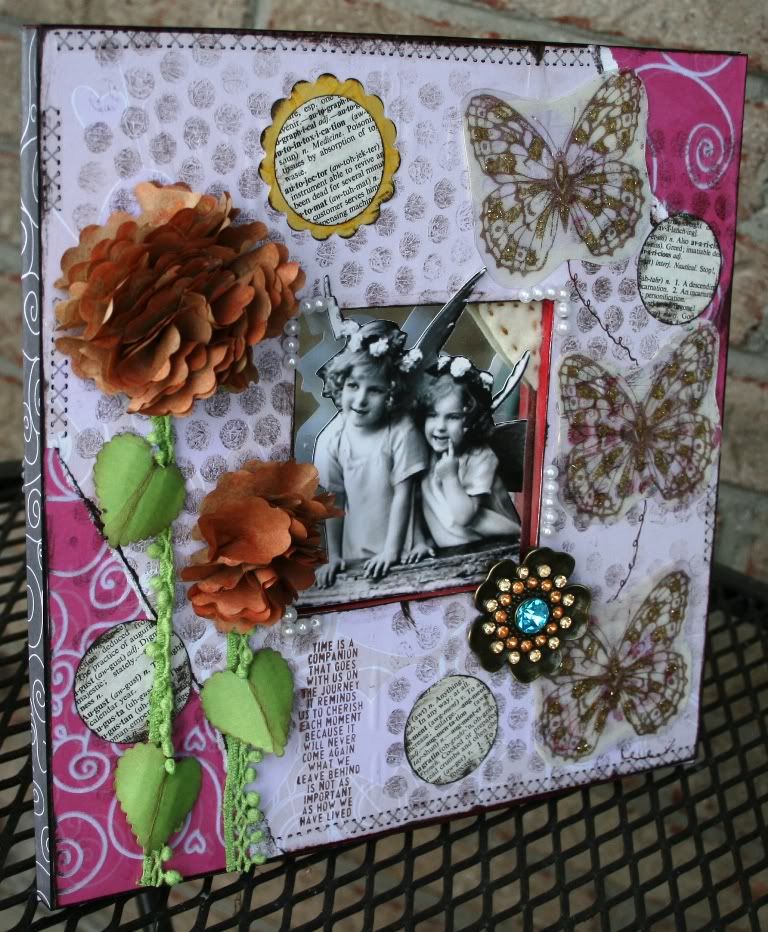
I've been really crazy playing with mist, paints and inks for the past couple of months. So, I decided to share with you what I did on this canvas display piece. Canvas is one of the most versatile materials which you can do almost anything on it. Inks and paints work amazingly well on canvas and you could add in embellishments to make out a good piece of display for your home or as a gift to someone.

For the canvas I created, I used a 8" x 8" size, applied paint over the whole canvas surface. You could mix a few colors for a better effect.

image

Next, I laid over a plastic mesh and sprayed mist over it to create a nice checks effect. You could even splatter the background with paints or spray mist over die cut or alphabets negative for a unique pattern.

image

This is how it looks after I removed the mesh. Let it dry completely before you start working on it.

image

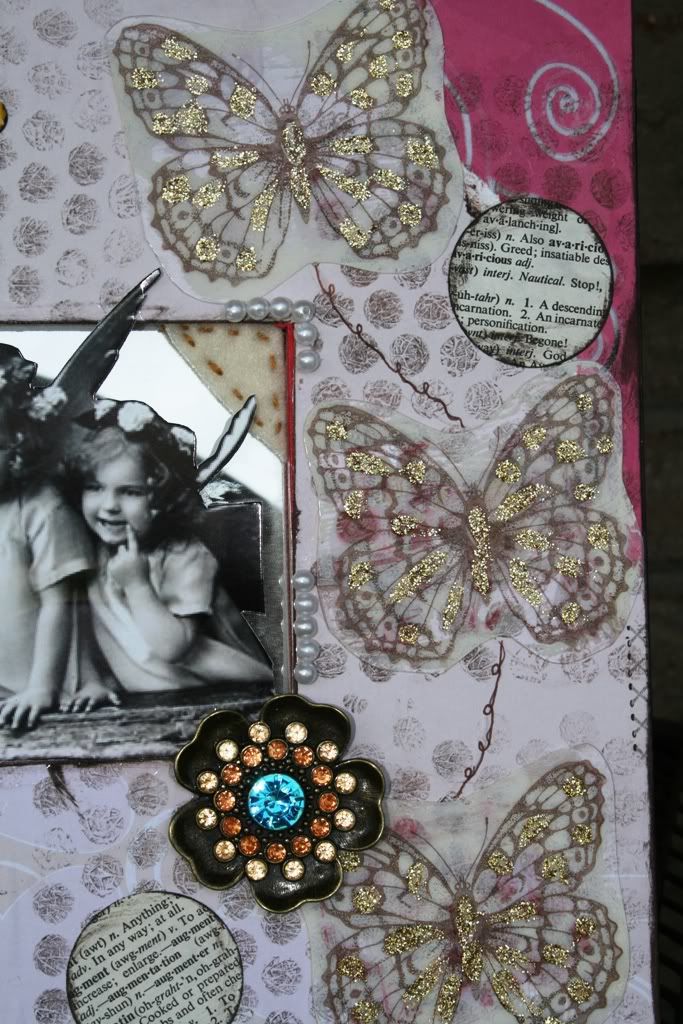
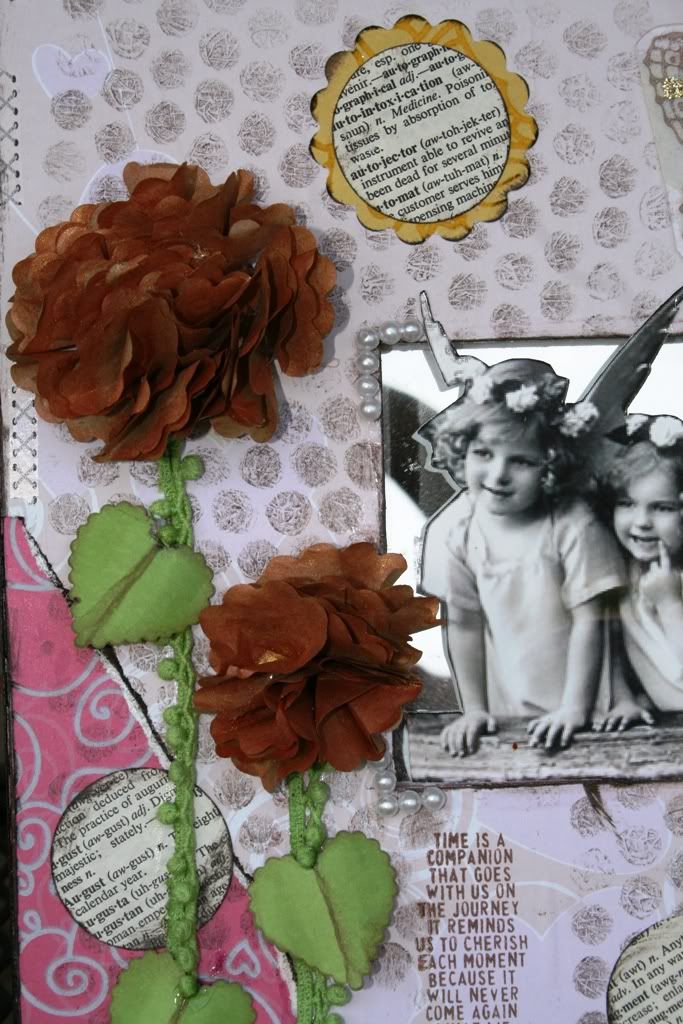
Lastly, I inked the edges for a distressed look and started embellishing my canvas. You can use almost any kind of embellishments on the canvas surface. Just use clear tape, glue dots or liquid glue to adhere everything onto the canvas. 

image

Here is the finished piece of my canvas display piece with pictures of my hubby and I. This piece would be displayed on the wall next to my other existing pieces. I just love looking at them while I work in my scrap room. It gives me a sense of happiness to see all them up on the wall.

image image image

I hope you'll enjoy creating canvas pieces with paints, mists and inks as much as I do. Have a great weekend and thank you so much for coming by again. :)

Leena Loh

Apr 27, 2010

Winner of the Mini Clip it Up

Shemaine Smith from California is the proud new owner of a Clip it Up Mini!!! Congratulations Shemaine- we’re so excited to see how you decide to decorate it.  Please send us pictures :-)

image

A special thanks to Prima for taking the time to show our readers cute ways to customize their Clip it Up’s to match their rooms and unique personalities. 

image

image

image

Thanks again!!! Renee will be decorating a Clip it Up with Prima products soon so keep checking our blog for new ideas!!!

Simply Renee

Apr 26, 2010

Quote of the Week

We are what we think. All that we are arises with our thoughts. With our thoughts we make the world.
-Buddha

Apr 23, 2010

Mother’s Day Present

This is a shadow box that I altered to hang in my scrapbook studio.

image 
image I bought the black shadow box at my local scrapbook store and distressed the edges with sandpaper. I started the inside by covering the shadow box backing with patterned paper and layered another piece that I had added a decorated edge to. I then took two pieces of chipboard a little smaller than the back and adhered them together and put patterned paper on them. I adhered them to the center back of the shadow box backing with 3d foam square to give a little more dimension. I then used my die cut machine and cut out cardstock squares, circles and flowers from patterned paper and layered once again with 3d foam squares to give more addition. I finished the flowers off with brads and die cut a butterfly and embellished with rhinestones to add an accent to the frame.

This is a quick and easy project for any occasion. I bet mom would love one for mothers day!!

Karen Taylor

Apr 22, 2010

Clip it Up and Quilting (Drawing details below)

As everyone knows the Clip it Up started out as a great way to organize Scrapbooking embellishments and supplies.  However as if it has a mind of its own the Clip it Up has branched into soooo many other markets and we’re continually hearing about how many ways the Clip it Up has helped people organize.  It’s gone from scrapbooking to recipes to fly fishing accessories (yes I’m serious) and so much more.Clip_It_Up_with_Doll_Clothes
Clip it Up Main Base and Upper Tier with doll clothes (picture taken by a customer)
Quilters love the Clip it Up products and so we’ve decided to branch out into the quilting market.  We’re attending the International Quilt Show in Minneapolis May 21-23 (If you’re in the area come visit us in Booth #1128, 30).  We went to the Quilt Show in Houston last fall and it was so much fun and we’re excited to go again this year. 

Clip it Up displaying patterns at Material Girls 
Renee was interviewed by Quilts, Inc (the company who sponsors the show) click here to read the article.  She did a fantastic job and for anyone who doesn’t know how we began it’s a great intro and a fun story.  We love Renee and we’re soooo grateful for the Clip it Up. 
Simply Renee
The owner of this fabulous craft room scrapbooks and sews. Notice the Swinging Wall Arm (left side) is holding rulers :-)
We love all of our customers as well and we want to hear your story about how the Clip it Up has helped you.  Send your stories and pictures to clipitup@gmail.com and we’ll post them on our blog in the next few months.  Plus you’ll be entered for a chance to win FREE Clip it Up products (product to be announced later and will be based on the winners organizational needs).  Please send us your story by May 6th, 2010!!!
Bobbi

Apr 21, 2010

Vintage Angels Altered Mirror

By:  Keely Yowler

April 22 is Earth Day.  Everyone talks about recycling, repurposing, and reusing items in scrapbooking.  But, where do you start?  The project I created today, "Vintage Angels Altered Mirror", incorporates many recycling ideas.  I'll show you how to use everyday items to create fabulous scrapbooking accents.

1.  Create a background stamp with packaging bubblewrap.  Don't throw away that bubblewrap.  Use alone or wrap around your acrylic stamping block, ink with permanent ink, and stamp to create a distressed, textured background.

2.  Use costume jewelry pieces and beads to accent frames and photos.

3.  Create overlays from plastic packaging.  Stamp images with permanent ink onto plastic.  Let dry and cut around image.  Dry brush cream paint to back of plastic to accentuate image.  Accent front of image with glitter glue.

4.  Punch shapes from book pages to use as accents.  I used an ordinary circle punch, inked edges, and adhered to my mirror.

5.  Create photo corners from felt pieces.  I stitched around a left-over piece of felt with embroidery floss to create this easy photo corner.

6.  Create flowers with brown paper lunch bags and cardboard.  I used a scalloped circle punch to create these flowers.  Punch shapes, ink, gather centers, and adhere to punched cardboard circle.

7.  Use ribbon and fiber scraps for dimension.  Instead of using a piece of cardstock to create the flower stem, I used a left-over piece of fiber trim.  These are also great to create photo frames, outline journaling, and add dimension to cardstock pieces.

8.  Repurpose your punches.  Stack shapes, use portions of shapes, and be creative.  These leaves were created with a scalloped heart punch.

9. Use those paper scraps.  Challenge yourself to create a project with only the paper scraps you have from your last project.

10.  Visit your local thrift store.  I purchased this mirror for 50 cents.  There are plenty of items that are begging to be repurposed.

Have a wonderful Earth Day!

Keely Yowler

http://www.keelyy.blogspot.com

Supply List:

Kiki Art Patterned Paper: Amor collection #010101, 010103, 010133, China collection #020124, Jardin collection 040102
Kiki Art Fun Tape: Familia collection #050201
Kiki Art Decorative Trim: Green #770101
Stamps: Stampin’ Up butterfly, Ranger journaling
Punches: Fiskars flower, 1” circle, 2” circle, heart
Ink: Tsukineko permanent ink brown
Glitter Glue: Sulyn Industries
Felt: Unknown /Cream
Paint: Delta White
Embroidery Floss: DMC Tan
Pen: Zig Brown
Recycled Items: Dictionary Pages, Brown Paper Lunch Bags, Packaging Plastic, Costume Jewelry, Cardboard packaging, Bubble wrap, Mirror, Vintage Photo
Adhesive: Modge-Podge, Alene’s Tacky Glue, Foam Dots

Apr 19, 2010

Quote of the Week

“What lies behind us and what lies before us are tiny matters compared to what lies within us.”
― Ralph Waldo Emerson

Apr 14, 2010

Michelle's Tags

It just dawned on me that my last post started out with jealousy (in reference to some peoples' amazing craft spaces) and this post I'm going to start out with guilt - LOL If you're like me, you fall in love with every new line that comes out from the various paper manufacturers. Everything that comes down is the bestest design you've ever seen and you can't wait to get your hands on it. And just like a little kid with a new toy at Christmas, you forget about it once you open the next one.

So I decided to make some tags - starting within my scrap box....

SimplyReneeTags10_04_09_10
I pulled out various cut/torn pieces of colored cardstock from Papertrey Ink.
SimplyReneeTags9_04_09_10
I ran the larger pieces through my Big Shot using the Top Note die, and the smaller ones I just cut down and rounded the corners.
SimplyReneeTags7_04_09_10
And then I went way back to Cosmo Cricket's Honey Pie paper pack. This pack for me is my most favorite collection from Cosmo Cricket to this day. It's like classic Cosmo Cricket - the fun colors - both pale and primary, the country feel, the great sentiments, the quilted pieces - just so much goodness in this one collection.
SimplyReneeTags5_04_09_10
I have bags of scrap ribbon hanging off my Clip it Up! ribbon organizer that I can see and reach for to complete my projects.
SimplyReneeTags8_04_09_10
Gotta have my Glue Dots. If there are buttons on my project - which is like 99% of the time - there are Glue Dots on my craft table.
SimplyReneeTags6_04_09_10
A little love taggie with some great ribbon that I picked up at Practicing Creativity Designs.
SimplyReneeTags3_04_09_10
The "dreaming of" piece was probably meant for a scrapbooking page. I'm not a scrapbooker, so I just covered that up *wink*
SimplyReneeTags4_04_09_10
Topped with more ribbon from Practicing Creativity Designs - and look, more buttons *giggles*
SimplyReneeTags1_04_09_10
And a fun little JOY tag - can use this for a baby gift....wedding - or maybe even a wintery Christmas package.
SimplyReneeTags2_04_09_10
I hope you've enjoyed my post today - and I would encourage you to show your scraps and those old patterned papers that you've been hoarding or forgotten about a little bit of love; they miss you!

TTFN

Apr 13, 2010

Join Prima and Clip-It-Up as we venture together to create some amazing altered Clip-It-Ups using lots of luscious Prima products! Plus a chance to win a Clip it Up Mini!!!

image
How to win a FREE Clip it Up Mini
1.  Visit Prima’s blog a see how they have decorated the Clip it Up.  Check back throughout the month for new ideas.
2. Come back to our blog and leave a comment about how you would decorate a Clip it Up. 
3. The drawing will be held on the 27th of April.  Check our blog occasionally before then for multiple ways to enter.

Apr 12, 2010

Quote of the Week

“You’ve got a lot of choices. If getting out of bed in the morning is a chore and you’re not smiling on a regular basis, try another choice.”
― Steven D. Woodhull

Apr 9, 2010

Emeline's Altered Clip it Up

I'm constantly amazed by the many ideas the designers at Simply Renee's come up and I hope you are too ! Here in my craft space, the Clip it Up has its mighty presence to match its mighty functionality.

I took a good look at my Clip it up and noticed a great potential!
The simple metal piece at the top of the Clip It Up (let's call it the T-Top) looks like a stage waiting to be decorated; cajoling me to make something out of it.
This centre stage can be embellished with seasonal items, flowers etc. Here is what i'd done with mine.


- wrapped the tip of the stand with satin ribbon and tulle.
- i used cabbage roses (my current favourite flowers!) and arranged them onto the metal piece. I used a little hot glue to hold these into place. I know I can be fickle and I predict i'll want a different look perhaps a few weeks later. Thus I opted to use hot glue sparingly.


- Embellish further with green foliage. Apply hot glue sparingly.

that has to be the fun part - deciding what to affix the T-top with!
I chose to decorate the Clip It Up with flowers... but the possibilities are limitless.


You can choose to embellish with seasonal accessories or simply adorn with your favourite colors to spruce up your craft space .

Happy Crafting!

Apr 7, 2010

Too many photos of one event…

Do you have this enormous amount of photos for one event that it keeps you from scrapping it?  That happens to me a lot.  I don’t have time to whip out a mini album and I don’t want to use 40 photos on a bunch of pages.  So, lately I have been taking a handful of the best photos from an event such as my daughter’s field trip and printing them out quite small.  I group them how I want on my layout and try to capture the feeling of the event in just a page or two. 

image

1) Print your photos out and crop them to fit the design of your layout (mine are 2.5 x 1.75 inches.) 

2) Frame your photos using pattern paper above and below. 

For this next step, I decided to add a rub-on.  Rub-ons are something I have always loved but mine got put away in a binder for so long that I never remembered to use them!  Now that I have them out on my Clip it Up where I can see them, I grab them a lot more often. 

image

3) Add rub-on below last layer of paper.

image

4) Adhere trim on the seam line of the paper and photos. 

5) Embellish with homemade flowers (I used dictionary paper and a Prima flower for the middle.) 

6) Adhere title above the photos and journaling below. 

image

image

Supplies:

Cardstock – Bazzilll; Pattern Paper – Webster’s Pages, Collage Press, dictionary paper; Trim – Papertrey Ink; Flowers – Prima; Ink – Versa Magic chalk ink

Julie Overby

Apr 6, 2010

More Facebook Fans More Savings! Update

We're featuring a one day sale on April 15th, 2010 and the discount depends on YOU!!! Here's how it works- Become a FAN of Simply Renee Inc and then send an invite to all your friends and ask them to become fans. The more fans the more savings!!! If you're already a fan then just invite others!!!

If we get 500 Fans you'll receive a 30% discount
If we get 750 Fans you'll receive a 40% discount
If we get 1000 Fans you'll receive a 50% discount

The Coupon Code will be posted on our facebook page by midnight April 14, 2010. The code will be valid for 24 hours only and will be off your ENTIRE purchase on our website (www.clipitup.com).

Plus...to add to the excitement. Over the next few weeks we'll have random drawings and all you have to do to enter is become a fan!!! Make sure you check our page to see if you're a winner and to receive the coupon code for the sale on April 15, 2010.

We're already at 750 fans, but I know we can keep going and reach 1000. Plus we have a special surprise if we exceed the 1000 number. :-) Keep up the great work!!!

Apr 5, 2010

Apr 2, 2010

How the Clip it Up can help Organize Your Kitchen…


My friends are going to be shocked at the secret I’m about to reveal . . . for a very organized person I have one unorganized space – the kitchen junk drawer! And today I’m going to share how I’m using this 18” Ribbon Organizer

image

To tame this messy, disorganized drawer:

image

By the way, the steps I followed to organize my kitchen junk drawer are the same steps you can follow for any organization project!

Step 1: Empty the drawer completely.

Step 2: Put away all the things that don’t belong back in their correct place. In my case this was a lot. Hehe! This drawer tended to be the easiest place to dump things!

Step 3: Sort/categorize all that remains. I ended up with lots of little piles on my kitchen table.

image

Step 4: Organize/put away all items in their new home.

For my drawer, I first lined it with a non-slip mat and used takeout containers to hold some like items. Look how much space I ended up with!

image

I just knew the Ribbon Organizer would be perfect for some of my ‘junk drawer’ items. Here’s a look at the finished result:

image

Garbage bags fit in the top nicely and getting one from the roll is a breeze! The slots in the side are great to keep markers that I use frequently to label items for the freezer etc.

image

As I have a very curious two year old daughter, this was a great opportunity to put things up high, out of her reach such as matches, batteries, light globes etc.

image

Some packets I’ve clipped directly onto the ribbon organizer and smaller items have been placed in a Ziploc bag first.

One last note – I’ve hung my Ribbon Organizer on the back of my kitchen door using over-the-door wreath hangers that I picked up at Christmas! It’s easy and secure and a great way to utilize this organizer if you are unable to permanently screw it to the wall.

Thanks for looking and I’ll be back with more organizing tips soon!

Gail Lindner

Related Posts Plugin for WordPress, Blogger...