May 4, 2011

Clip it Up Mini Winner

We have a winner!!! Thanks to random.org our winner is…

weze said...

what a gorgeous job you did altering the Clip It up & it would make a fabulous mothers day gift for myself since I have 4 grown sons who just don't do that shopping thing....

Congratulations!  Email your address to clipitup@gmail.com and we’re send you a Clip it Up Mini that you can alter yourself :)

Clip It Up Mini

~Don’t forget about our fabulous Mother’s Day Sale* going on right now!!! The 36” Ribbon Organizer!!! Plus the more you buy the more you save-use these coupon codes:

  • Order $50 worth of product receive $5 off by using coupon code: May5
  • Order $75 worth of product receive $10 off by using coupon code : May10
  • Order $100 worth of product receive $25 off by using coupon code : May 25
  • Order $200 worth of product received $25 off by using coupon code : May100

Codes valid for retail customers at www.clipitup.com only.  Specials subject to change. International customer email us clipitup@gmail.com to order!

Where to extra store die cuts

Hello everyone, Sarah here to share with you a shaped card that I created with a fantastic die cut base. Die cut machines are wonderful to use in order to add shapes and embellishments to your work, but I find that dragging out my die cut machine is a lot of work and clean up. So, when I actually do get out my die cut machines I like to cut in bulk. I have dozens of die cuts this way at the tips of my fingers whenever I feel the need to add them to my projects, but the problem with having all of these on hand is that I have to find a place to store all of my die cuts.

This is where my Clip It Up Main Base and Upper Tier has come in handy. I have used my Clip It Up Zip Bags as holders for all of my die cuts and this system has worked beautifully for me. Not only can I fit a giant stack of die cuts into the Clip It Up Zip Bags, but the bags come in 4 different sizes which helps me with organizing my die cuts so that I can easily find the die cuts I’m looking for. I have used the medium sized bag which measures 7”x7” to hold my scalloped shaped card bases, and here is my card that I created using one of my die cut card bases which was right at the tip of my fingers when I needed it!!

image

image

I hope that you will try these Clip It Up Zip Bags to hold all of your crafty odds and ends.

image

Have a wonderful day! -Sarah

~Don’t forget about our fabulous Mother’s Day Sale* going on right now!!! The 36” Ribbon Organizer!!! Plus the more you buy the more you save-use these coupon codes:

  • Order $50 worth of product receive $5 off by using coupon code: May5
  • Order $75  worth of product receive $10 off by using coupon code : May10
  • Order $100 worth of product receive $25 off by using coupon code : May 25
  • Order $200 worth of product received $25 off by using coupon code : May100

Codes valid for retail customers at www.clipitup.com only.  Specials subject to change. International customer email us clipitup@gmail.com to order!

May 3, 2011

YouTube Video

I received an email with a link to this YouTube video Nicole  from the GingerCupcake Cards Channel posted.  Check it out and leave Nicole a friendly comment!

May 2, 2011

Simply Renee & Teresa Collins Giveaway

Happy Monday everyone! I have some exciting news today! Simply Renee Inc. and Teresa Collins have joined together to host a fabulous giveaway! TWO winners will be chosen to receive a
wonderful prize.
Hereʼs what you have to do to be entered into this giveaway:
  • Leave a comment for this post to be entered to win a Clip it Up Mini! (that way you can alter your own).
  • Head on over to Teresa Collins’ blog and leave a comment to be entered to win a products from her Posh collection.
On Wednesday, May 4, one winner will be selected to receive a Clip It Up product from Simply Renee Inc., and one winner will be selected to receive products from Teresa Collinsʼ Posh collection.
I was fortunate enough to have the opportunity to combine these wonderful products to create a ʻPoshʼ Clip It Up.
image
This Clip It Up Mini was altered using Teresa Collinsʼ gorgeous Posh Collection. The base and divider tabs were decorated using the beautiful papers from this line. Each tab was also embellished
with a decorative brad. The post was wrapped with coordinating ribbons and trims, and the tri-arm was accessorized with Donnaʼs Gems Blingage.
image
image image
image
image
Be sure to leave a comment for this post and on Teresa Collinsʼ blog before May 4 for a chance to win. Good luck!
Have a beautiful day!
Natasha

Quote of the Week

“Most people see what they want to, or at least what they expect to.” ― Martha Grimes

Apr 29, 2011

Altered Clip It Up Products- Vintage & Grunge Minis

Hi everyone! I am so excited to share my altered Clip It Up products with you today. I had so much fun altering them! I hope you like them. :o)

image

First let me tell you a little bit about this product. Both of these are Clip It Up Minis with Upper Tiers. When I received my box from Simply Renee, I immediately tore it open with excitement! I was so anxious to assemble it and start clipping my supplies up! I
literally put my Clip It Up Mini together in less than one minute. The ‘clipping up’ part took longer because I had so many products to put on it. I decided to fill my mini with supplies before I altered it to familiarize myself with the product. I wanted to make sure
that my planned alterations would not compromise the functionality of this wonderful product.

In the past I stored all of my bling and flowers in plastic boxes. Although boxes are pretty, they are not the ideal storage solution to suit my needs. A box is the perfect solution for items that will be put away and stored for a long period of time. This was not the right organizational system for me. For products I use frequently, I needed a better way to store and easily access my supplies. Since I only have a few hours every evening to craft, I needed the best organization system possible to prevent me from wasting valuable time. I would literally waste at least an hour just searching for the products I planned on using. I remember feeling frustrated after my long search for supplies which caused me to lose the desire to create.

Another drastic change I noticed was the reduction in clean-up time. When I used boxes, I dreaded the clean-up process because I would complete a project and find my floor completely covered with open boxes. With the Clip It Up, it only takes a few minutes to clip my supplies back up! (My two young children even enjoy doing it for me!)

The Clip It Up comes with clips and divider tabs, making it easy to organize your stash. There are also optional accessories sold separately such as the Clip Grips, Storage Cover and my favorite... the Zip Bags. The Zip Bags are fantastic! I keep loose items in my Zip Bags such as pieces of bling that were cut up and left over, small chipboard elements, etc. I have seen others use regular Ziploc bags instead, but to be honest, I prefer the Clip It Up Zip Bags because they are much sturdier and hang better which
makes it easier to flip through my supplies. The ‘zip’ closure is also on the side of the bag which means that I do not have to unclip it to open it.

Can you believe I was able to empty out FIVE boxes of supplies onto ONE Clip It Up?! I was amazed at how much fits onto this small product! I was so happy to be able to see all of the products that I own. I also noticed that I had duplicates of many items
because I had no idea I had already purchased them! With the Clip It Up, I know exactly which products I have and will no longer waste money on buying the same item twice.

I now own several Clip It Up products and all of them are very light-weight and sturdy. They are easy to move from one location to another. They are also very easy to disassemble, making it perfect and convenient to alter. Let me show you just how easy
it is!

For my vintage Clip It Up, I added lacing to the top of the base. To do this, you must first drill the holes.

image

You will notice that beneath the base there are plastic divisions that support the base. Please keep this in mind when drilling your holes.

image

Using the faint markings on the top of the base as a guide, I taped on strips of paper (created using a border punch) to mark my holes. I drilled the holes using a 1/8 inch drill bit. Just a quick side note- the Clip It Up box you see beneath the base is excellent
for many different uses. I use it to mist, paint, emboss etc. So don’t throw it out! :o)
image

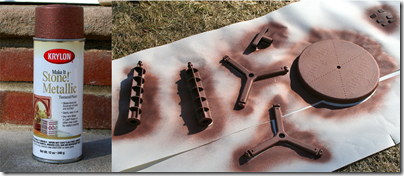
The first step is to paint your Clip It Up. I found this great paint at my local craft store that is a metallic paint with a stone texture. Paint each part of the Clip It Up and allow them to dry thoroughly. If desired, apply a coat of clear gloss as well to protect the painted surface.

image

The rings were painted a gold color using Rub’n Buff. Apply the medium to the ring and then gently buff to a luster.

Once all of the parts are dry, reassemble the Clip It Up. Now comes the fun part... the decorating!! There are so many possibilities! First let me show you how I altered my
vintage Clip It Up.

image

I added eyelets to the holes I drilled and used lace for the lacing. The chipboard elements are all made by The Dusty Attic. Each chipboard piece was inked and decorated with a little bling.

image

The pole was wrapped in lace and adorned with mulberry flowers. The tri-arms were also wrapped in lace. Remember to decorate each piece individually, otherwise, the arms will not turn.

image

The divider tabs were decorated with papers from TPC Studios to coordinate with my vintage theme.

image

Here is a glimpse of the top of the handle. I kept it simple because I wanted to be sure I would be able to grasp the handle to transport my Clip It Up.

image

Voilà! The finished product! I have all of my Prima Flowers hanging on this Clip It Up. It is now so incredibly easy to find the right color or flower that I need.

After altering my first Clip It Up, I felt the urge to alter another! But this time I decided to make it grungy! Check back next Friday and I’ll show you the details of my second one.

Natasha

Apr 27, 2011

Fun with Echo Park and Tips on Organizing Spellbinders Templates

Hello everyone! Tina here with a quick post to give you some tips and ideas on making the most of your crafting space!

I had the honor of being a guest designer for a fabulous kit club called “My Scrapbook Nook” for the month of April. I created this LO using the kit that they sent me! I just loved working with these Echo Park papers!

image image

In creating this page, I played with some really fun Spellbinders™ die templates. I recently got back from the Spellbinders™ design team retreat, and came home with lots of fabulous die templates to create with! My first thought was which of my Clip it Ups would house them the best!!?? I decided that my Main Base would do just perfectly! If you are not familiar with Spellbinders die templates, they come in a variety of sizes, so I needed something that will hold all of the sizes in one place! The Spellbinders™ Grand  Nestabilities® are a touch wide, so I clip them slightly to the side of center, to help it to still turn well. But the height is perfect even for the 12 inch border dies!! I have not gotten to alter the one yet, but rest assured… I will!

image

Do you have a die cutting machine? How do you store all of your templates or cartridges? Have you thought about using a Clip it Up When I get my space ready (it’s coming along QUITE nicely!!) I also plan to have a Wall Mount or Swinging Wall Arm near my cutting station so that I can clip up the ones I am using on a particular project and have them in front of me!

So here are some organizing ideas and thoughts that I’ll leave with you today…

*Use the Main Base to clip up your die cutting templates or cartridges.

*If you don’t have a lot, consider using a Swinging Wall Arm or Wall Mount! (both items on sale now)

*Remember that you can use your Jumbo Clip it Up for collections and kits? Keep them in a zip lock bag and hang them up! Are you part of a monthly kit club? Do you have a dozed pizza boxes stacked up? THIS is your solution! Organize them by month and you’ll always have them out in the open and accessible for use!

I hope that I have inspired you today to get organized or to get crafty! Either way…

Happy Scrapping!

Tina

Related Posts Plugin for WordPress, Blogger...
