As a new member to Simply Renee’s Altered Design team I have been asked to share my studio with you today and I am delighted to have you. So... grab a cup of coffee and sit right back and come with me into my sanctuary.
I am lucky enough to have a whole room to myself. My husband and I finished it a year ago last November and I could not be more thrilled. When we first completed it I thought I had way to much space but it did not take long for me to fill it up….and I mean FILL it up. Thank goodness for Simply Renee and ALL of their wonderful products.
I don’t know what I would do without my base unit…just look at all the stickers and embellishments that it holds.
I love that they are within reach and I can see what I have. If I need some inspiration it is so easy to look at all the wonderful items that I already have.
I use a bag to hold my extra clips and grips until I need them.
My Jumbo……I love my JUMBO!!
I use it to hold all my wonderful magazines….I love to have them within reach.
I also use a clip it up bag to hold items together for upcoming classes I will be teaching.
I hope you have enjoyed this peek into my creative space. I hope I have inspired you to think of all the ways you can use the Clip it Up to make you creative space your own haven.
Karen Taylor
Jan 29, 2010
Jan 28, 2010
Kids Room Organizer
Great idea to help organize your kids room. Special thanks to Robert's Arts and Crafts and Good things Utah for sharing!
Click here for more info-Kids Room Organizer: Robert's Arts & Crafts
Click here for more info-Kids Room Organizer: Robert's Arts & Crafts
Jan 27, 2010
Valentine's Treats
Hello Hello!! It's Michelle here with a fun lil' Valentine project I made for my son's second-grade class. I wanted to make something with these cute little acetate pillowboxes that I picked up at Embellish It Online.
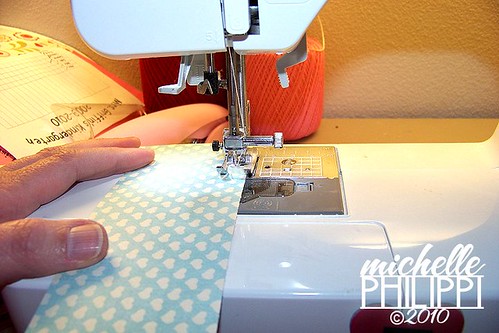
I started by cutting some fun Pink Paislee paper in to 2.5" strips. And then just for a little something extra (like a backache after doing 25 of these!), I added some stitching. I chose this wavy pattern instead of a straight-stitch or a a zig-zag because of the rounded pattern on the paper.
I then cut a busier piece of Pink Paislee paper in to 1.5" strips and adhered them to the bottom of my stitched heart piece.
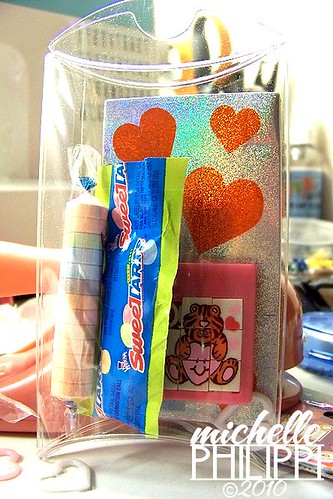
Then I filled my pillowboxes: a little heart notepad, a little Valentine game and some plastic Valentine confetti (all from Oriental Trading purchased for cheap out of season *wink*) and some little SweetTart candies - got those cheap too...more about that in a bit.
My happy little mess....
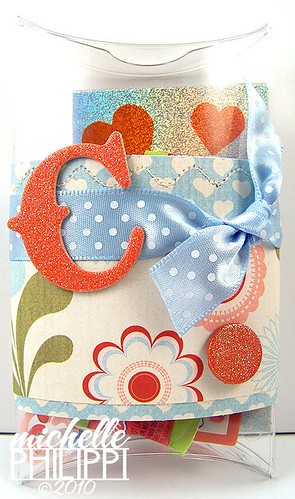
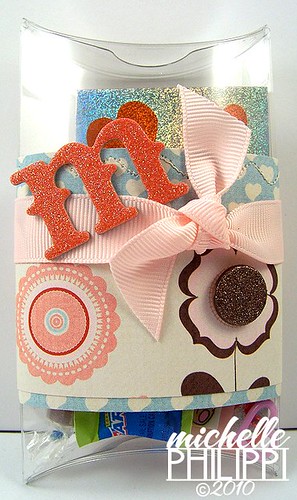
I also purchased these coordinating glittered chipboard letters and put each child's initial on their own treat package to personalize it. I felt like the package needed just a little something else, so I used the brads that match from the Cupid line as well. Because I already had the paper adhered, I cut off the backs of the brads with a wire cutter and stuck a piece of dimensional adhesive on the back instead of having to poke anything through which could be dangerous for little kids anyhow.
I used different colors of ribbon - all from Papertrey Ink - Melon Berry, Spring Rain, Sweet Blush and Spring Moss (not shown).
And last but not least - the story of the candy. It's Halloween candy! Oh no you didn't. Oh yes I did! I totally put Halloween candy in a Valentine package - LOL I bought this $3.99 bag at Target after Halloween on clearance for 90% off. That would be 40-cents my friends. And candies like SweetTarts never go bad, plus, they're nothing but colored sugar - just what the kids like, right?!
I hope you've enjoyed my first post with Simply Renee. I'll be back next month with a little craft area reorg for ya'll. If you're making anything special for your kiddies and their classmates this Valentine's, leave a link - I'd love to see it!
~ Michelle
Jan 25, 2010
Jan 22, 2010
Let's Get Organized
The Clip It Up is a fabulous tool that you can use for home organization. I am going to show you the details of how it has helped to really pull my family's paperwork together.
I have divided up my Clip It Up base unit into 4 sections. Each family member has a section for their information. I personalized each section with a divider that has their initial on it. At the bottom of the divider I punched a hole a strung ribbon for a decorative effect. There are many ways you could split out your categories. You could sort by type of item, such as bills, advertisements, coupons, etc. I'll give you the highlights of each section that I have created.
Weekly grocery advertisements are something I use frequently, but don't ever have a specific place in my house. Now they are easy to reach, and I can easily pull specific ads when needed. I first folded the ad in half, then lengthwise. When I clipped the ad to the unit, I made sure to show the store name on the front for easy identification.
Sunday coupons- I hung the entire packet on a clip until I am ready to start cutting which coupons I need for the week. The 7x7 Zip Bags are a convenient place to hold clipped coupons. I then can easily put the Zip Bag in my purse when grocery shopping.
Other items I put in my section are: restaurant menus, restaurant coupons, recipes torn out of magazines, stamps, address labels, and thank you cards.
Kids Section: School calenders, newsletters, book orders, art work doctor appointments, and haircut phone numbers.
Husband's section: Bills, concert tickets, coupons specifically for him, reward cards, and dentist appointments.
I was able to easily put the Clip It Up unit on a spare dining room chair in the corner of the room. It is easily accessible to all, and is convenient for me to update on a weekly basis.
We would love to see how you use your Clip It Up for home organization!
Valerie Allen
Jan 21, 2010
Paper Pileup
Around my house, paper organization is a major challenge that I deal with on a daily basis. I have a constant influx of mail, kids paperwork, coupons, bills, and grocery advertisements stored in all sorts of places around the house. I'll even admit to putting some of those papers in the bread box!
Tomorrow I am going to show you how the Clip It Up Base Unit can alleviate much of the paper pile up that can quickly overtake your desk or dining room table. It can easily be set out in an open area so the entire family can easily find the papers they need quickly. Now, it is going to take some thought on your part- what papers do you struggle with keeping organized? The fun begins when you start personalizing the Clip It Up to fit your needs!
Valerie Allen
Check back tomorrow!!!
Jan 20, 2010
Buttons Are a Girl's Best Friend
Ok, yes, I know that Marilyn Monroe would disagree. But when you're a crafter, buttons are every bit as valuable as diamonds -- and a LOT easier on the pocketbook.
Last month, I posted on my blog about my love for (and growing collection of) buttons. It started me thinking of new ways to use them that I hadn't tried before. So I pulled out some chipboard -- a pre-cut shape and a sheet of raw chipboard -- plus some glue, ink and, of course, a few handfuls of buttons.
I used my Slice to cut a 3-inch number 6 from a piece of scrap cardstock. I then turned the shape face-down on the raw chipboard sheet and traced it with a pencil. Using a craft knife, I trimmed it out, then filed down the edges. Then, I inked the entire shape in black (you could use any color) to ensure a nice consistent background color.
You can also skip a few steps by choosing a pre-cut chipboard shape (such as this heart) and inking it.
Once the ink is dry, start applying buttons one-by-one using a good liquid adhesive (I'm using Zip Dry). Overlap them a little so some of them stand out a bit. I chose to use multiple shades of pink and red for the heart.
Or you can go crazy and use lots of different colors, like I did on the 6.
After you've finished, use pop dots or a liquid adhesive to adhere them to your project. Here's how I used mine on a layout and a card.
Layout supplies:
Bazzill Basics cardstock (Kraft)
The Paper Studio cardstock (yellow, white)
Sassafras patterned paper (Anthem)
Sassafras journaling spot
October Afternoon date sticker (Cherry Hill)
Jenni Bowlin Studio alphabet stickers (Reverse Red)
American Crafts Thickers
Queen and Company paper trim (red wave)
Slice die-cut number and star (Noteworthy, Basic Shapes)
Tsukineko Chalk Ink (black)
Other: buttons and ribbon
Card supplies:
Bazzill Basics cardstock (pink)
Imaginisce patterned papers (Perfectly Posh, Lucy Bird, Sweet Cheri)
Imaginisce rub-on (Sweet Cheri)
Imaginisce ribbon
Slice die-cut label shape (Noteworthy)
Fiskars border punch (Apron Lace)
Tsukineko Chalk Ink (white)
Cosmo Cricket Buck Naked Chipboard (Buttons and More)
Other: Buttons
Robyn Schaub
http://dreaminginscraps.
Last month, I posted on my blog about my love for (and growing collection of) buttons. It started me thinking of new ways to use them that I hadn't tried before. So I pulled out some chipboard -- a pre-cut shape and a sheet of raw chipboard -- plus some glue, ink and, of course, a few handfuls of buttons.
I used my Slice to cut a 3-inch number 6 from a piece of scrap cardstock. I then turned the shape face-down on the raw chipboard sheet and traced it with a pencil. Using a craft knife, I trimmed it out, then filed down the edges. Then, I inked the entire shape in black (you could use any color) to ensure a nice consistent background color.
You can also skip a few steps by choosing a pre-cut chipboard shape (such as this heart) and inking it.
Once the ink is dry, start applying buttons one-by-one using a good liquid adhesive (I'm using Zip Dry). Overlap them a little so some of them stand out a bit. I chose to use multiple shades of pink and red for the heart.
Or you can go crazy and use lots of different colors, like I did on the 6.
After you've finished, use pop dots or a liquid adhesive to adhere them to your project. Here's how I used mine on a layout and a card.
Bazzill Basics cardstock (Kraft)
The Paper Studio cardstock (yellow, white)
Sassafras patterned paper (Anthem)
Sassafras journaling spot
October Afternoon date sticker (Cherry Hill)
Jenni Bowlin Studio alphabet stickers (Reverse Red)
American Crafts Thickers
Queen and Company paper trim (red wave)
Slice die-cut number and star (Noteworthy, Basic Shapes)
Tsukineko Chalk Ink (black)
Other: buttons and ribbon
Card supplies:
Bazzill Basics cardstock (pink)
Imaginisce patterned papers (Perfectly Posh, Lucy Bird, Sweet Cheri)
Imaginisce rub-on (Sweet Cheri)
Imaginisce ribbon
Slice die-cut label shape (Noteworthy)
Fiskars border punch (Apron Lace)
Tsukineko Chalk Ink (white)
Cosmo Cricket Buck Naked Chipboard (Buttons and More)
Other: Buttons
Robyn Schaub
http://dreaminginscraps.
Jan 19, 2010
In with the “new” but not out with the “old”
We’re introducing two new products at CHA-Winter this year. We’re so excited that we wanted to share our new products with our loyal customers and friends first.
The new 6-foot tall Clip it Up Floor Model comes with three 15” diameter arms that can be moved up or down to accommodate different size of products. The Floor Model can hold thousands of different items using minimal floor space. You can see and quickly access your whole collection of supplies, making your project faster, easier, and more fun! Additional Floor Model Arms are sold separately for added storage. Additional Floor Model accessories will be added to the line in the near future.
The new 36” Ribbon Organizer Attachment for Large Ribbon Rolls attaches to the 36” Ribbon Organizer and doubles your ribbon capacity. It holds 4.5” to 6.5” diameter ribbon rolls.
Expected shipping dates are May 2010.
Please give us your thoughts on these new releases. On Feb.1 2010 I’ll have a drawing including everyone who has left a comment. The winner will receive a Clip it Up product of their choice (not including the new products - sorry those won't be in stock for several more months).
Thanks and happy organizing!!!
Jan 18, 2010
Quote of the Week
“Just because something doesn’t do what you planned it to do doesn’t mean it’s useless.”―Thomas Edison
Jan 17, 2010
Quote of the Week
"The mediocre teacher tells. The good teacher explains.The superior teacher demonstrates. The great teacher inspires." -William Arthur Ward
Jan 11, 2010
Quote of the Week
"It is our choices ... that show what we truly are, far more than our abilities".
J.K. Rowling
J.K. Rowling
Jan 10, 2010
Jan 5, 2010
New Design Team
We are excited to announce our New Design Team! This year we're doing things a little different and we're dividing into 3 different teams.
Project Design Team-members will post about a recent scrapbook or craft project, as well as one Wednesday a month we'll have a Clip it Up product review by one of these members. Post's will be every Wednesday. Members: Leena Loh, Keely Yowler, Michelle Philippi, Robyn Schaub, and Julie Overby.
Organizing Design Team- members will post about how to organize using the Clip it Up. Post's will be on Fridays. Members: Erika Taylor, Valerie Allen, Gail Lindner
Altered Design Team-members will post about a recent altered art project, including an altered Clip it Up! Post's will be on Fridays. Members: Karen Taylor, Nicole Rixon, Angela Fehr, Wendela Lam, and Emeline Seet.
Congratulations to our new members and thanks to everyone who applied. We received so many wonderful applications it was hard to pick. Which is partly why we split up into 3 teams :-) Please apply for our next one!
Bobbi
Simply Renee Inc
Jan 4, 2010
Get Organized!
The holidays are over and the New Year is here. It's time to get organizing. Birdie Brennan, a professional organizer from Columbus, OH has some ideas for you. Check out her website at www.getorganizedcolumbus.com
Quote of the Week
“Cleaning your house while your kids are still growing up is like shoveling the walk before it stops snowing.”―Phyllis Diller
Subscribe to:
Comments (Atom)


