Jun 2, 2011

Celebrate the men in your life with a Clip it Up!!! *CONTEST*

Men have lots of different hobbies fishing, golfing, skiing, biking and hunting and they have the same problem with organizing as women do.

Remember you use what you See!

IMG_3404

Scott Bryne's hobby and passion is "Tying Flies" What a great way to display all his items and now he can see what he has. Scott loved it so much he took it to a local fishing store and now the store is carrying our products. A big thanks to Scott!!!!

Help us think of more ways men can use Clip it Up products to get organized. Email or leave us your idea as a comment and we will pick one random winner to receive the Clip it Up Jumbo . Contest ends June 30th.

Jun 1, 2011

Great ways to use the Swinging Wall Arm & Pouty Granddaughter Layout!

Happy Wednesday everyone!

I hope you had a wonderful Memorial Day weekend! For today’s post I want to talk about the Clip It Up Swinging Wall  Arm . These are handy little things to have around. I have found them to be perfect for holding the embellishments I receive in my Kit of the Month club. I don't like putting them with my other embellishments because I am afraid I won't remember which is which. The Clip It Up Swinging Wall Arm solved my problem. I now know where to go to find my kit of the month embellishments.

image

Another good idea for these is to use them for a temporary storing station of new product. If you are like me, you don't always have the time to put your new product where it belongs, or you might have to make room for the new product.  By using a Clip It Up Swinging  Wall Arm you won't have new product laying around cluttering up your room.  In a matter of seconds you can clip your new product up and then when you find the time, put your new product where it belongs, thereby making room for your next purchase. These are pearls I recently purchased, and I am trying to decide on where I want their home to be.

image

Here is my layout:

image

image

image

I used various Jillibean papers that were donated. I added white cardstock and did quite a lot of punch work. Like my last post, I tried to make most of my embellishments out of the paper. I did add some white buttons and Thickers. The tiny flowers in the center of the blue flowers are made by Prima. The subject of my layout is my Granddaughter who was not too happy at that moment, but I think it makes an adorable photo. I hope you have enjoyed my ideas and layout.

Have a wonderful week! 

Barbara

May 30, 2011

Quote of the Week

"Being deeply loved by someone gives you strength, while loving someone deeply gives you courage." Laozi

May 27, 2011

Tina’s Craft Room Update

Good morning everyone! Tina here with a quick little CRAFT ROOM UPDATE!! If you have been following along, you know that I’m in the process (long process) of getting a craft space. If you are just joining us in this journey, you can check out the past post here.

Today I just want to show you where we are at. The room is officially done!! Floor down, lights up, painting done (except for a few touch ups) Check it out!!

Here’s a photo that I shared in my last post… with plans…

image

And here it is now!

image

I LOVE that flooring! And the lights are beautiful! Now comes the fun part! Adding my STASH!!

image

However, I am in the process of looking for cabinets… yes still! Hoping this next week I’ll be able to get something. It’s hard to find used cabinets that suit what I want! If we don’t find something soon, I’m going to have to get them made! But that’s a little harder on the wallet! LOL!

So, while I wait for cabinets,… I have grown impatient. So, my sweet Hubby moved in my old table and I have trucked some of my stuff up! I was getting SO tired of my dining room looking like a Scrapbooking store upchucked in it! ROFL! Seriously! It was getting bad! So here is the beginning of what will be MY SPACE! I have my Main Base set up with my Spellbinders die templates. I also have my Mini with lots of my smaller embellies and ribbons. And there is LOTS of “stuff” just hanging out for now.

image

Today I’m setting up my FLOOR MODEL!! THAT will get rid of lots of the stuff hanging around! I also have a Wall Mount, a 36” Ribbon Organizer and some other fabulous Clip-It-Up products too make this space as work friendly and organized as it can be!!

So tune in next time to see my temporary work station while I wait for the cabinets… I’ll check back in a week or so with my “temporary” pics…Then hopefully the next post will be my space in its full glory! WOHOO!! It’s getting close!

Thanks for stopping by!!

~TINA~

May 25, 2011

A Few Pages and Bad Habits…

We got to work with a fantastic stash of paper products from some of the best companies the past month and I wanted to share two layouts that I created.

Both of these are based on some Page Maps sketches by Becky Fleck.
This first page is about my 35th Birthday, and I got to play with some of the birthday line from Nikki Sivils and some papers from My Little Shoebox.  One of my favorite elements was the “banner” that was actually upside down birthday hats!  Too cute!  (This also inspired another project that I am working on that you will see in the near future, too! )

image image 

image

This next page is also about a birthday…kind of.  I made some “practice” cupcakes for Charlotte’s 2nd birthday, and she has really maybe only had 1 or 2 in her life, so I wanted to make sure she liked them!   I used the cupcake line from My Little Yellow Bicycle.  I can’t begin to tell you how many different embellishments and extras there are that coordinate with LYB lines….there is just so much to choose from!!!

image

image image

image

So having all these great embellies also leads me to one of my bad habits.  When I have used a product from my Clip It Up, or I have a new product that I haven’t hung yet, I have been just placing the packages on top of my Clip It Up!  Bad, I know.  So I am thinking about adding something to the top of my Clip It Up, like just a piece of decorated chipboard, so that I can decorate it and deter myself from piling up all my embellies.  I am envisioning a cute little decorated cup or bowl to keep some clips in so that I can just reach in and grab a clip, add it to my product, and “Clip It Up”!

image

On a side note, remember that little video (click here) I shared with you of my scrap space about two months ago?  Well Bye-bye scrap room….we are making a nursery for Baby #2 which will be here sometime in early August!  J

I have set up shop in our large game room/family room upstairs.  I purged a lot of stuff, but my organizational strategy is still pretty much the same.  I feel great about my new space and it has allowed me to work in the same room with my little one as she plays and while hubby watches TV!
image image

image image

Thanks for reading my post today and next month I am going to use my stash on my Clip It Up for a layout, and ONLY things on my CIU…should be fun!

Audrey

May 24, 2011

Spring Quilt Market 2011

The Spring Quilt Market was a huge hit. We didn’t have to travel far since it was held in our home state of Utah.

This year we were without Renee because she was in Hershey, PA for her son’s  graduation from Medical School. Congrats Dr. Nathan Hull!!!!

Bobbi, Carolyn and Kathy did the show!!!!  Since our products hold so much, we’re especially grateful for Riley Blake Designs, Lecien, Button Galore, Kati Cupcake, Izzy and Ivy Designs, Atkinson Designs, and The Fiber Goddess for sending products for us to display!!!!  Take a moment to check out their websites and new products - they are amazing companies!

143 Kathy and  Sweet Sweet Nireko from Lecien’s

Setting up is always the hardest part, but the end result is always worth the effort.  It takes 2 days to set up and 2 hours to take down :)
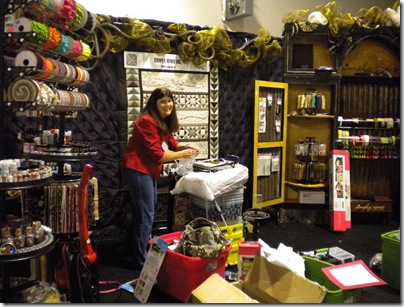
127

After Bobbi and Carolyn set most of the booth up, Kathy came in and worked her magic on the decorations.  People loved our booth and said it had a steam punk feel to it. They loved all the junk with the fabric flowers in the mesh!!! Kathy’s quilt was a huge hit, she is amazing and so talented and we are so happy to have her helping us at the shows. She also did the Schoolhouse class on “Don’t Agonizes Organize” Thanks to all that came and to Kathy for doing a great job!!!!

139

133

Renee and Carolyn found the metal springs and other rusty old junk at Smith and Edwards after hours of digging. One of our many fun finds.

141

140

Our New All-In-One  coming in August.

We always say  we are going to be really good about taking pictures at the show but we get busy and forget.  So here are the couple that we took. Yes, Bobbi and Carolyn did work but they also  did a great job of avoiding pictures :)

136

Kathy sharing our products with store owners.

137

142

Kathy and talented authors, Ruth and Liz.

We had so much fun and enjoyed seeing old friends.  Our favorite part of the show is meeting and spending time with  many talented and sweet people .

We hope to see you all at the Houston Fall Quilt Market in October!!!!

Simply Renee Team

May 23, 2011

Quote of the Week

“Anyone can hide. Facing up to things, working through them, that’s what makes you strong.”
― Sarah Dessen
Related Posts Plugin for WordPress, Blogger...
